Tuesday, 11 January 2011

4) Who would be the audience for your media product?


This is Kris. He’s a 21 years old and is a university student. He spends most of his time studying, socialising with his friends and playing music.
In his spare time he enjoys driving, going out for a drink with his friends, watching movies, listening to music, spending time with family and seeing his girlfriend.
His hobbies include playing guitar, playing football and tennis, going on road trips and going on the computer.
His music taste is varied, but prefers listening to Rock, Alternative, Electronica, Blues/Jazz and Acoustic. He spends most of his time playing instruments including Guitar, Bass and Piano.
He likes bands/artists including John Mayer, Foo Fighters, Biffy Clyro, N.E.R.D, Kings of Leon, Red Hot Chilli Peppers, Greenday, Coldplay, The prodigy,  Lenny Kravits, Eric Clapton and Pendulum.
He enjoys watching different types of movie genres such as Comedies, Horror, Thrillers, Action and Science Fiction. This includes films such as Inception, Jackass 1&2 the movie, 500 days of summer, Rainman, Kung-fu hustle, batman series, Star Wars, Napoleon Dynamite and Kill Bill.
TV shows include things such as Jackass, Lost, Friends, Have I Got News For you, Top Gear, (animated cartoon series) such as family guy, American dad, Ren and Stimpy.
He isn’t a huge fan of shopping, but he likes to shop occasionally in shoe shops, go to stores like Top Man, Republic, Bank and River Island – but he prefers brands the odd brands such as Bench and Diesel.
The reasons to why this particular person would probably watch my film is because he represents a young adult who enjoys what most young adults would like, listen to and watch.
Since he’s into thriller films and enjoys listening to music, I think he would appreciate the film but would also take particular interest to the music, being in time with the thriller film opening and throughout the film.


The film would probably be aimed at a range of ages and different people/genders who would like to watch a thriller. This can include men and women aged 15 - 50+.

What the audience thought of my film?
(Heres an example of the questionnaire I have designed around my film so that I can ask an audience to watch it and then fill out the questionnaire to give me general feedback and information on their opinions about films and my own film.)

Questionnaire
What gender are you?
Male Female

What age are you?
15-20    21-26    27-22    23-28    29-34    35-40    41+


What do you think the reason is to why a thriller appeals to you?
The feeling you get from it (emotions from the film)
The content of the type of film
Its style
Typical storylines
Other ..............

What makes a good film to you (mainly/specifically)?
The film opening
The effects
The storyline
The characters
The music/sound effects

What aspect of my film opening grabs your attention the most?
The starting point of the film (opening)
The images/film
The dialogue (characters)
The music

What would you say I should have improved/changed on my film the most?
The props
The characters within the film opening
The location
The amount of dialogue
The story line
The effects (sound and visual)
The camera movements/angles/shots


Results from asking the questionnaire:
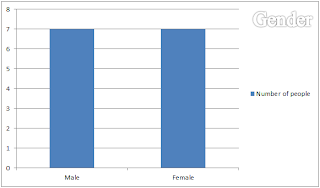
What gender are you?
Male
Female
7
7


What age are you?
15-20
21-26
27-32
33-38
39-44
45-50
51+
4
4
3
2
0
1
0
What do you think the reason is to why a thriller appeals to you?
The feeling you get from it (emotions from watching the film)
The content of the type of filmIts styleTypical story linesOther ..............
7
4210


What makes a good film to you (mainly/specifically)?
The film opening
The effects
The storyline
The characters
The music/sound effects
4
2
4
2
2


What aspect of the film grabs your attention the most?
The starting point of the film (opening)
The images/film
The dialogue (characters)
The music

6
4
1
3

What would you say I should have improved/changed on my film the most?
The props
The characters within the film opening
The location
The amount of dialogue
The story line
The effects
The camera movements/angles/shots
7
0
2
3
1
1
0
I have asked a total of 14 people, of equal genders, to look at my film and give me their opinion of it. The reason I chose 14 people specifically is so that I can have a set of more reliable results than I would have had with a couple of people.
With each of the questionnaires answers and I filled in the number of people who selected a specific choice, I then created table charts - a visual representation of the feedback.
This enabled me to see, visually, alot easier on what the people preferred out of the closed questions which I had included and what their opinions were.

What have I taken away from the feedback on this questionnaire, based on my opening film sequence.By looking at the feedback I had gathered from my questionnaires, I have a better understanding on other peoples views on thrillers and my own film. Such as, If I were to have more time or if I were to do it again, how could I improve on my film opening and what would make it even more of a success!
The people who answered my questionnaire did give me more positive feedback than the negatives when I was talking to them, but the questions I had asked focused more on making my film opening better - If I could.

Comments:

By looking over my comments from my class (see ‘Main Task – Result’) I have been able to get each of their opinions and thoughts on my film opening. From the 10 comments I had received, I have been able to have a better understanding of what my audience thought of it and how it could be improved.

The positives I found out about my film opening from the viewers included the opening, mentioning that it was interesting and eye catching - and the use of including the zooming in and out of the lights was different and created a feel to the audience as if they were being 'pulled in', into the screen itself.
Alot of my comments included positive points about the effects used within my opening film sequence, including points about good representations of parts within the film (such as the flash backs) and the effect added to the light to make it as if its crawling down the wall. Other comments on the editing/effects also included the way I made the screen black/blank to raise suspence to the viewer - which had apparently worked!
I also had a comment about the light at the beguining and it giving a futuristic feel to the viewer.
I had positive feedback based on my titles of my opening sequence, being told they were 'simple and effective' - which applies well to the style of the film (thriller).
The music/sound was said to be use really effectively with the style of my opening and creates a mood and tension throughout the film opening. The heartbeat sounds were said to be effective as the shots went well/in time with the sound of the heartbeats.

I also had lots of positive on the shots and camera angles that I used within my film opening, such as inlcuding lots of shot variations and being very 'creative', 'arty' and 'different'. I had a comment mentioning that camera twists within a part of my film makes the viewer want to watch it even more - since it raised suspence for them.
I also had a comment saying about the choice of my film opening being filmed in the night time. They said that the film opening being filmed at night gave it a 'spooky essense'.
The characters / actors within my film opening were said to have carried and pulled off their characters very well and professionally. I was also commented on the choice of having actors hood up throughout the - gave a 'hint of suspision'.
The film opening was said to make the viewer feel that they are on the edge of their seat - waiting / wondering whats going to happen!

As well as the positives, I had been given a few critisms and opinions of those who had viewed my video within my class.
I had been notified in a few of my comments that my viewers felt that the sound of the 'hit' didn't sound very convincing or as effective as it could have been.

I also had critisms based on the darkness of the setting and that it was hard to see the detail within the frames.
One point made was that I was told if I could do it again - I should think about how dark the shots are whilst filming and how I could improve that (by editing perhaps). A similar critism to this is that I was told that some of the viewers couldnt see the actors because of the lighting.
One of the main critisms I have been given is that some of my viewers were confused at the end of my film opening and were struggling to know what was going on. I was aware of this from the beguinning of my plan and had a feeling that some of my viewers wouldn't understand what happened or what is going on. But themain purpose of this was to make the viewers more interested/likely to continue to work out what would happen and what the storyline is.

5) How did you attract/address your audience?


For this task - I have used Youtube to annotate and outline how I have attracted and adressed my audience of young adults.
I have tried to pick out and talk about some of the parts within my film opening sequence that show my creativity and intentions towards attracting my target audience.

6) What have you learnt about technologies from the process of constructing this product?

Throughout the process of constructing this product, my knowlege and abilities on using equipment such as the computer (inc. its programmes) and the camera (inc. its additional equipment) has increased. All of the equipment and applicatons I will be talking about have all given me a extreme benefit towards my work and final project.

(An example of myself working on the computer)
Apple Mac Computer:
The Apple iMac Computer was the main piece of equipment I have worked on for posting, processing, creating and editing my work for most of this project.
The equipment included a power source for the computer, various cables for the connection of the internet, keyboard, mouse..etc and included ports for electrical devices such as headphones, microphone and USB memory sticks.
This particular piece of equipmwnt was a great use to me as it had a large 21.5 inch screen and enabled me to work effeciently by being able to have various applications and programmes open at once (such as having the Internet / Blogger open whilst using Premiere pro to edit / create my project).
The Apple Mac included all the sources I needed such as the Internet and various applications, including Adobe Premiere Pro and Photoshop.
The computer also enabled me to create my own space/folder to store all of my work and images in one place, which enabled me to go back and continue with my work and creating new documents.
I would say that the Apple iMac is one of the best computers you can work on in terms of creating a product such as my own (films/film openings) because it can handle a variety of equipment to be connected to it (such as the camcorder) and is also great for enabling myself to do the work quickly and efficiently.

Camera recorder (HVR-HD1000P):
The HVR-HD1000P is a High Definition camcorder which is perfect for filming many types of occasions such as weddings, sporting events...etc. But the particular use of this camera whilst I was using it was to film the various work and projects I have been set out to do throughout this course, especially the main task to shoot a film opening.
With this particular camcorder, I was able to use it with or without a tripod and the ergonomic feature of it enabling the user to have it rest on the shoulder when recording, was a great use and as time went on - I was able to use it without problems.
The camcorder includes many supplied accessories such as a Lens Cap (to protect the lense from getting scratched), a lens hood (to prevent any extra light going onto the lens), a microphone (to record sound whilst recording the film footage), a touch screen (to enable viewing the film itself, playback and the various settings) and a large sized eye cup (to enable the user to look through at the footage being shot)
The film footage was saved and shot using a film tape which I could easily insert and take out from a panel on the side of the camcorder.
The camcorder also had a ergonomically designed handle which enabled me to use and carry it easily and safely without using a tripod or when I didn't use it upon my shoulder.
The sound quality of this particular camcorder is also a good quality - in terms of capturing the actors voices when they are speaking and other background noises (such as walking upon the leaves in my film). At one stage, I used the camera specifically to record the sound for when I needed to record my commentary of the film.
The functionality of the camcorder enabled me to efficiently record my film, such as the choice to have auto or manual choices, such as auto focus - which is what I had used for most of my filming as it meant that in dark conditions, I could trust that the camera has automatically focused it for me.
Overall, I found this particular piece of equipment was an excellent camcorder and was highly straightforward in terms of how to use it and how it appled well to my type of film.

Tripod:
 The tripod is a three-legged piece of equipment which enables stability along the side-to-side and up-and-down Coordinate axis of motion and provides a large amount of leverage. The only disadvantages to Tripods is that they can be heavy and bulky, however, they are a huge advantage in terms of being used with large equipment.
This piece of equipment came to a greate advantage to me to ensure that I can successfuly create a steady shot whilst filming, and in the type of conditions and area I was filming in, the tripod enabled me to personally adjust its height, angle and steadiness.
It also included a handle which meant, if needed, I could rotate the camcorder in a panning motion or a titlt, which turned out to be highly effective in terms of the footage I was filming.
Alot of my shots involved the tripod to create a clean sweep from side to side or an up and down motion. Alot of these shots enabled me to create a high suspence feel in the film and to enable me to be more creative with the types of movements I could achieve,
The tripod was also easy to transport as it can be clicked down back into its original/manageable size, where it can be easily put into a bag.
 
 (An example of myself using the camcorder with the Tripod)

(An example of myself with the camcorder and the Tripod in its carrying case)

Blogger:
Blogger is a 'Blog' publishing service that allows private or multi-user blogs with timings on the entries. I have used the 'Blogger' website all throughout my previous projects. This website enabled me to keep a personalised 'Blog' for all of my work based on this subject.
I was able to post different sections of my project into separate posts so that they can be viewed easily and to be in an organised style.
The various features on this blog publishing website has enabled me to post visual content such as images, video and text so that I can exaplain in detail about my project and the various factors about it.
The website enables text, video footage, images, links, formatting, editing, content allignment and lots more!
I found blogger a very straightforward website to use, and so far, I haven't had any trouble with it.
At first, it was all fairly knew to me and I found that I was slow on knowing how to use it and how to organise my posts - but over time, I have found it all very easy and efficient.
I would say this particular blogging website is one of the best on the internet, as it is easy to use for people of all ages and allows any posts of a variety of purposes - such as school projects, businesses, work and social purposes.

Adobe Premiere Pro:
 Adobe Premiere Pro is a software which is specifically designed for the making of films (video editing). The footage of films are based on a real time timeline, which shows the length of the film footage and enables 'cutting' the fim into shorter sections.
Adobe premiere Pro includes many features such as tools (including: select, cut, move...etc) and enables you to import footage and export the final result of video.
Throughout my use of Premier Pro, I used most of the features mentioned. For example, I used the cutting tool feaure to cut my film clip files down to a specific size - especially when I made my film in time with the music, this tool came in extremely useful for me.
I also used the feature 'Import' to put in images, video footage, music...etc into my Premier Pro document, where I was editing/creating my film opening.
I found this particular software fairly straightforward and easy to use and I also thought it was a very suitable programme for people of all ages, because I feel that anyone is able to use it because there aren't very many tricky things about it.


(Creating/setting up a new project)
To do this I simply opened up a new project on Premiere Pro and was then able to set up and name my project. It also included various presets which were available for the type of film and the footage.

 This is the Tool bar which enabled me t use a various choice of tools and functions to use. Such as 'Select', 'Track Selection', 'Ripple Edit', 'Rolling Edit', 'Rate Stretch', 'Razor', 'Slip', 'Slide', 'Pen', 'Hand' and 'Magnify/Zoom'.
The main tools I had used to help me throughout my project mainly involved the use of Select, Cut, Ripple Edit, Hand/grab and Zoom.
The tool (shown in the image above, below the Toolbar) enabled me to use the magnification of my project by using the sliding function.

Throughout the project, I had used various types of Video Effects to help with the effects and visual styling of my film clips.
There are many folders containing different types of effects that can be added to the video clips. Some which I had mainly used throughout my project includes Blur and Sharpen: Gaussian Blur. Colour Correction: Brightness & Contrast. Image Control: Black and White. Stylize: Alpha Glow, Solarize, Strobe light. Transform: Crop, Horizontal Flip.

Above is an example of the type of editing that can require a more in depth and manual edit of audio or visual effects/content within the project. The points and the lines enabled me to adjust and set the way in which I wanted the audio or visual footage to work with the project.

 This block was visible at all times (Top Left corner) so that it was easy to access if I needed to important any material. It enabled me to transfer all of my imported videos, music and images into one place and drag them into my timeline if and when I needed them.


To import a file, I simply went into 'File' and selected 'Import...'
I was then able to go into any accessible folder and find the file which I wanted to be imported into my project. This included the many cut film clips I had kept as a separate file, Images and music which had been intended for my project.

In order to import the video file from the film camera, I had to use the 'Capture' tool. This enabled me to run through the content on the film camera and he footage which I had captured.
With the capture, play and fastforward/backward enabled me to capture the footage in parts so that I could save each piece of footage in lots of manageable parts, rather than one huge stetch of footage.

When making my film project, I had to include some opening titles in order to add to the effect of the film opening sequence.
To do this I selected the '....' icon, which enabled me to create and edit my own title. With the various options of effects, fonts, sizes and so on, I was able to create a title under my own control and choice.

Photoshop:
Adobe Photoshop is a graphics editing programme, which enabled me to edit images and text, to the be used in Premiere Pro.
 A really useful thing I found out is that Premiere Pro also integrates with Adobe Photoshop. Photoshop files can be opened directly from Premiere Pro and then be edited in Photoshop. Any of the changes made will immediately be updated when the Photoshop file is saved and focus returns to Premiere Pro.
I didn't use alot of Photoshop in my work, but it did come in useful from time to time when I had to edit something like titles/text or a photo for my final project piece.
However, even though I have been familiar with Photoshop before, I found that I learnt alot more about the tools and features available (such as turning individual images to become a singular file and tile them together, the crop tool, select tool and resizing the image) and how they can apply to my work creatively.

Adobe After Effects:
I did have a try on a programme called 'Adobe After Effects' is a digital motion graphics and compositing software that can apply to films and video.
I begun to use this programme to help me with my titles for my movie - but I had a few difficulties creating the font I wanted and to a particular style, so I ended up not using it.
However, I did find that it was a good programme in terms of creating more detailed text for titles, as it gave more options and effects for text.
By using this programme briefly throughtout my project, I know that I can refer to it at some point in the future for more creations of films.

Google:
Google is an internet 'Search Engine', which is useful for looking up furthur websites, information, images, maps, news, shopping, mail and so much more!
I used this search engine to look up various information for my project such as about media in general, camera shots, examples of film footage, looking up other websites and finding images to apply to my ideas and work.
I found this site extremely useful as it is simple to use and, most of the time, find the types of things I was intending to look for on the internet.


Wikipedia:
Wikipedia is a free, web-based encyclopedia project which anables others to view information on over 17 million articles from around the world - 3.5 million in English.
This web based encylopedia enabled me to research more into depth information on topics that I wasn't familiar with at the time, such as camera angles, shots, techniques, companies, distributors...etc!
I found this site extremely useful throughout my project as I was able to access information for myself and to understand alot more about the types of things I wanted to know about for this project.
Hotmail:
Hotmail is a free, web-based email sevice that is run by Microsoft. I already had an account with this particular web-based email service so I had some familiarity with the site.
The beneficial purposes of this particular site througout my project is that it enabled me to recieve and send information to / from others within my classroom from home or where ever I was (including my teacher - who sent us emails when we weren't in class to let us know about deadlines, work...etc)
This was useful for me as it enabled me to communicate with others / for help and information purposes throughout the project.
Youtube:
YouTube is a video-sharing website on which users can upload, share, and view videos.
I used this website to upload, watch and share videos.
For my my final task (film opening sequence), I put it up onto youtube by uploading it and got an 'embed'. For my Main Task, I used Youtube to get the code and to put it onto my own Blogger - so that other could view my video from my Blog. This wasn't too hard to do - since I only had to copy the code from my youtube account of the video and paste it into the HTML section; so that it can be shown as a video feature.
I also used Youtube for parts of my evaluation, such as the annotated and commentated version of my final film opening.
Youtube was extremely good for the annotation purposes of 'Evaluation Activity 5' as it enabled different features and ways of annotating and letting me adjust the frames to a certain size and position.

7) Looking back at your preliminary task (the continuity editing task), what do you feel you have learnt in the progression from it to the full product?

Before the Main Task, I was set out to do a Preliminary task, which was based on learning and understanding three fundemental shots; 360 degree rule, shot reverse shot and match on action.
Throughout the preliminary, I focused on learning a bit more about the equipment I was using such as the camcorder, the tripod and the software I was using on the Apple iMac computer.
I found that it was useful that I was set out to do this task before the main, proper task - as it gave me a little more experience with the equipment and the types of things I had to do throughout the making and editing of my final film opening sequence.

180 degree rule:
The 180 degree rule is where two characters in the same scene should always have the same left/right relationship to each other. If the camera passes over the 'imaginary' axis creating a connection to the two subjects, is called crossing the line. The new shot, from the opposite side, is known as a reverse angle.
I didn't use the 360 degree rule within my final / main task because there wans't a need for it - as there was no dialogue within it.
Even though I didn't use it within my final task, I did try to consider it within my final film opening and I did find it useful to understand and learn about the shot previously; throughout my preliminary.
In my preliminary task I learnt how to do this by fixing the camera on a tripod and keeping it in one place, but rotating it to show the character speaking to the other from one side, and the other character responding back to the previous character who was talking. This enabled me to understand the process and how it is made this way to create an effective clip.

(Images from my Preliminary Task to represent my use of the 180 degree rule)

Match on Action:
A Match on Action shot is where two different shots are done to make the two shots graphically match, to help establish a strong continuity of action and linking the two shots together (metaphorically). In my preliminary task, I used the technique to show the process of walking through a room using a door, by showing the character begin to open the door with the handle from one side, and showing oth characters walking into the room from the other side.

 (Images representing the Match on Action shots from my Preliminary task)

 (Two examples of Match on Action shots used within my final task / film opening.)
The images above show some of the shots used in my final film opening whichenabled me to use the effect of a 'continuity edit'.
The first example was showing the characters feet walking along the pathway, to representing a point of view shot of him looking up at the light and the leaves above him, to showing him continuing walking down the long stretch of pathway.
I found this was effective in my film opening as it was good for showing those three shots representing to the viewer as if it is in one space of time and not separate shots in different times.
I also thought that the way of the filming and the Match on Action created a feel of suspence as the shots progressed and more of a flow to the film itself.

Shot Reverse Shot:
The shot Shot reverse shot is where one character is show lookin at another character and then the ohter character is shown looking back at the other character (the first). This is an effective film technique as it shows the to the viewer that the characters are facing one another.
I didn't use this particular technique within my final task because there wasn't many speaking parts or conversation which where this particular technique could be applied.
However, at the initial stages of thinking about what I wanted included in my film, I did think about how I could incorperate this technique to add more of a variety to the film itself.

(This is the two shots from the preliminary task that represent the Shot Reverse Shot technique.)

Following Shot:
From my preliminary task, I used a particular type of shot called a 'Following Shot' which is where the camera follows behind or along with a moving subject. In my preliminary, I used the following shot to show the process of the two characters having a conversation whilst walking up the stairs towards the doors.
I used this particular shot within a majority of my film opening (main task) because I wanted to follow the character and show to the viewer the types of areas he is walking in to build suspence.
I also found it a good technique to use for my particular style of film opening and from the preliminary task to my main task - I was already prepared for the types of things I needed to consider if I was looking for a clean following shot; by using a Tripod.


Zooming/Close-up:
In film 'Zooming' is known as being a camera movement which can zoomin in and out of the focused object; to either get closer or further away.
In my preliminary task, the zooming in technique of the dress was used to emphasise the character looking directly at the dress and foreshadowing what is going to happen. In my main task, I used this technique to zoom in and out of the street light from the characters point of view.
I would say that from my preliminary task, I have progressed towards my final task because in my preliminary task, I found that the zooming in of the object wasn't very steady - to achieve a more steady shot, I knew that if I were to use a Tripod or be alot more steady with the camera, I would be able to create a more smooth zoom into the object.

Throughout the making of my Final Project, I found I was being more creative with my shots and techniques and they didn't necessarily follow the same pattern as my preliminary task. The preliminary task was good for building up my confidence and my knowledge on whats possible, whats not possible, how things can be done, how things should be used ... etc which helped towards my final idea.
This includes different techniques that i included within my Final Film Opening, but wouldn't necessarily be found in my preliminary task.
For example, I used strange and free willed shots by spinning the camera around whilst pointing upwards looking at the leaves/trees above me to create more of a dizzy/confused look and style to the film opening - to reflect a sense of abnormality to the film.

I also used a variety of Low Angle and High Angle Shots, which I didn't use alot within my preliminary sequence - but this did encourage me to be more creative my including more low and high angle shots within my main task.

I also included the technique of Panning and Tilting within my main task. I had already experienced a tilt within my preliminary task when the characters are walking up the stairs. I used this technique alot in the beguinning of my main task/film opening sequence when my main character is walking along the pathways and through the streets.
(Examples of 'Tilt' used in both preliminary task and final task)
(Examples of 'Panning' used in both my preliminary task and final task)

Point of view shots:
Within my preliminary, I did include the use of a 'point of view' shot where the character looks at the dress, as well as in my final/main task I also used Point of View Shots where the character is looking at the lights, where the other character is looking at the victim from behind the trees and when the character looks at his watch and gun.
From my preliminary task, I was able to have a better understanding when using this shot for my main task, as I was able to think of better ideas for a point of view shot itself, such as moving it to hide behind the branches and trees to create more suspence to the viewer.

How I avoided issues and problems from happening in my Final task:
By looking back and reflecting on my work, I have seen that without having a preliminary task set for me, I would definitely of encountered the problems in my main task, rather than the preliminary.
Throughout my preliminary I did encounter problems and issues with filming that I wasn't prepared for, such as, the battery running low, using the tripod at the right/appropriate times, not understanding the functions/feautres of the camcorder properly, filming in a setting where our filming was constantly being interuppted by people walking through or being noisey in the background...etc!
With all of these problems that had happened whilst trying to film our preliminary task, I was able to consider what happened and how I could prevent it from happening in the future (for my main task)

Planning and problems:
When planning for my preliminary, I was finding it hard what exactly I was planning, such as the story line and how it can make sense to the viewer and run smoothly. Most of the time, I was focusing on the fact that I had to ensure that I included the three main shots, which I had to include (360 degree rule, match on action and shot/reverse shot). I also had to create a script for the actors to speak and revise - With this, I had to make sure it made sense and applied well with the storyline and shots. Finally, I had to think about how long each of the separate shots would last for so that I could have a rough idea on how and when I would get it done and think about the final result whilst editing.
With all of this, it ended up being a benefit. Because by going through all the problems and struggling through the work, it ended up being an advantage for planning for my main task.
When planning for my main task, I was alot more prepared and thought through my idea thoroughly and thought of ways I could avoid problems which I had previously encounted in my preliminary task (such as: where to film it - without having interupptions, when - in terms of what day, whether the weather was appropriate for filming, what - precautions I would have to take if something did happen...etc).
When it came to coming up with a story board for my Final Idea, I found it a struggle to think of a unique and interesting story line. I decided to have my film opening to be set on a 'Thriller' genre - because I was familiar with the types of films and what conventions are to be included within a thriller. I also found that because of my particular style and taste with things would apply well with this genre.
I also found the planning from my preliminary enabled me to plan for my planning!
The planning of this task enabled me to ensure that I wouldn't have any problems when filming for my main task. Even with this - I did have a few problems which I could not control.
I planned to film in the night time when it was just about to turn dark (but not entirely dark) but the problem was - that because it was around November time when I was filming, it went extremely dark all of a sudden, and I found that I was relying on the street lights to highlight parts of my film. Another problem was that it turned extremely cold. With this point, I was extremely worried about my actors comfort but I did make sure that I warned them before about the possible weather conditions and problems that could occur whilst filming. Because it was cold, I had provided them with extra warm clothing if needed and a flask of warm drink just in case they got thirsty. After filming, and when we were all pretty cold, tiered and hungry - I made sure that I provided them with prenty of food and warmth within my home.
Apart from these problems, the planning of my main task went alot better than the preliminary task because I was able to avoid plenty of disruptions from people passing by (since it was filmed at a particular time of night and in a particular area) and planned my time well so that my battery didn't run out. I also ensured that I charged the battery the night before filming so that I knew it would last a fairly long time.

The filming process:
With the experience I had gotten from my preliminary task, in terms of filming, I found I was alot more prepared and ready for the filming of my final task.~In the preliminary task, I had to work in a group of 4. It was a benefit in terms of getting feedback, giving ideas and thinking of factors which we had to remember whilst filming. However, it was difficult in terms everyone getting an equal go for filming and editing the footage.
I found working on my own was a struggle at times, but I enjoyed the fact that it was my own film and it was down to me to film it and edit it.
When filming, I found that I was really enjoying it and that it was going so well - because originally, I was prepared for the worst and if things were to go wrong but I found that everything went fairly well.
Before filming, I checked to see if the battery was fully charged and that the camcorder was fully functional, workng and ready to go.
Most of my filming was done by the help of the tripod which enabled me to keep steady shots when needed, but from time to time I was able to keep a steady shot free-hand.
Throughout the filming of my task, I found I was including ideas and shots that I hadn't thought of previously, because I found whilst I was actually filming - I had alot more ideas and inspiration in my head with the surroundings and the actors.
When out filming, I made sure I had more that one take of the shots I had planned out to do. This is so that I had more of a choice when it came down to selecting the best tak to put in my film.
I also had a variety of random shots which consisted of the actor and the surroundings. This is so that, if I needed a variation within my film or if my storyline was too short - I could simply place another piece of footage from the variety of choice I had backed up.
I was surprised at the amount of progress I had made in that short space of time, whilst filming my main task, to what I was like when filming my preliminary task

Editing:
I found editing very straightforward, quick and easy when using Adobe Premiere Pro. When filming my preliminary task - It was still the first few months of becoming familiar with software so I was still getting used to it and increasing my knowledge on the software, but because of the experience I had gotten from editing my preliminary task - editing for my final task was alot easier!
The major difference with my preliminary task with my final task, was the editing I did.
In my preliminary I did use the subtle editing techniques, such as brightness and contrast and editing the sound, However - I used a much wider range within my final task.
Whilst editing my final task, I found I was experimenting alot with the various effects I had on offer (such as solarize, black and white...etc) so that I could enhance the film footage and make it apply alot more the the genre and style of my film (a thriller).
This wasn't a disadvantage to me at all! But I found that my time was being consumed alot due to the fact I wasn't overly familiar with the effects and options available. I did come to grips with them eventually, but I wish there was a way that using a few effects within my preliminary task was incorperated.

Overall:
To conclude, I feel that I have made extremely good progress from mypreliminary task to my final / main task.
I am pleased with the result of my final film opening and never thought I could achieve something like it. I did go out of my comfort zone in terms of the storyline and the effects I used - but I hope it has ended up being a benefit and stands out to other.
I found I learnt alot more in terms of the media/movie industry, the equipment I have used (such as the camcorder, tripod, computer...etc) and the software I have used to construct, create and edit my film to get it to where it is.
From this project, I have lernt alot about media in terms of the entire filming process, editing, programmes, the industry, being a director and being in charge of the camera, using equipment correctly to get good results and so much more!
I feel that that from the very beguinning stages of learning about Film, I have come so far and I feel that I can go even further in terms of filming and getting better with filming in general as time goes on.
I do feel that if I were to have more time spent on working on the film, I would probably go over a few things and make it better in terms of the quality of the clips, the flow of the film and its style.

Wednesday, 5 January 2011

Main Task - Result


For my main task, I had to create an opening film sequence to a fiction film.
I decided to have the film opening be a Thriller/Action styled genre. The reason for this choice is because I thought I would be able to portray this particular genre in the right way, since I have a genuine interest to unique styled thriller films, such as the latest hit 'Inception' - which had given me the inspiration to take a risk in making a film opening with a 'twist'.
The storyline of my film opening is to do with assassination. The main character has been set out on a task to assassinate a person, but ends up being in the result of that persons own revenge.
The twist to this is that this particular character (who has been assassinated) has an individual difference - being able to to go back in time and redo what may have already been done.
So when the repeated scene, of him having his back towards the person and suddenly attacking as if he knew what was going to happen, it should give away to the viewer that there is something different about this character and is like no other.