
Durham County Comparison:
Durham County Remake:
Planning:


Filming - What I have learnt from the filming process?
Working and organising film crew and directing cast (even if you didn’t do too much of this you will have still learnt from watching or being on the receiving end of the process)
Overall, for this point, I found that working and organising a film crew involves a lot of work and organisation/preparation in order to make filming successful. When creating my opening sequence to the thriller series ‘Durham County’, I learnt that a lot of organisation was needed, such as where / when to do the filming at appropriate times for the film, when the actors were available, how well they could listen/carry out their acting and what I had to do in order to make sure that the acting was sufficient enough for the scene being made. I only had to use two actors for this particular film sequence, one being the main character (seen in many of the scenes) and one to play the girl in the red sweater, wearing a mask. No speaking was required for this particular sequence, so I found it pretty easy to focus, purely, on the image of the acting and not about the verbal speech. However, I have been aware that if I were to make another sequence in the future, I will have to consider the speaking parts of the sequence and what I would need to think about, such as the tone and the timings of the speaking parts.
Organising costume, getting changed, props, being in the public eye in costume.
Overall, I found that when considering things such as the costumes, getting changed, props and being in the public eye (in costume) made me realise how much I needed to think about when considering props / costumes. When filming my opening sequence, I had to think about how to get the props/costumes, how effective they would look compared to the real version and where to source them from without making interruptions to my filming, such as taking too long searching for the props, and just settling to things similar to the original. But if I think of it as me not making a copy of a film, but making my own, it wouldn’t be as much of a challenge, but i have realised just how much it can affect the viewing/perception of the film and how effective it can look; for example, how props/clothing and colour can represent and reflect things such as feelings, atmosphere and emotion.
When making our scene which involved props and costume (for the actor on the bank scene) we had to gather a red jumper, a black wig and a mask. It was an easy task to find and collect these items, but when it came to the final filming of the scene, we also had to consider how easy it would be for getting changed and being in the public eye in costume. It was easy enough to get changed into costume and using the props, but I did find that it was very strange recording with people passing by behind me with curious looks on their faces, but i made sure it didn’t affect me, the person acting the scene or the filming itself.
Putting camera skills into practice. Knowing what camera angles you needed to include and when and being clear about what you trying to achieve.
When it came to recording the footage of the title sequence, I found that I had to have the knowledge of knowing what camera angles, shots, movement and composition which had to be used within each scene.
Each scene which I had filmed and used for this sequence, included a lot of thought and time to make sure that I knew which angle had to be used, as well as the shots used, in order to make the scene effective for the viewer who is watching it. I wanted to created the same feeling with mine with what I felt when I first watched the title sequence of ‘Durham County’.
Realising the importance of making a shot list and storyboard
When considering the different, fundamental parts of this particular opening scene, I had to do some preparation and planning in order to make sure I knew what I had to do in order to make this successful and as accurate as possible. First of all, I decided to create a ‘hand drawn’ story board (This would help to write up and plan all of the different considerations, such as what the film scene looked like, the shots/angles used, timings, framing, props, actors and setting.) I also decided to do a real representation of the scenes that I had to do, by taking image clippings of each of the scenes from the film opening to give me a better guideline on how to achieve this recreation. The making of the story boards gave me a better / clearer understanding of the kinds of things I needed to think about and plan before I started filming, so that I knew the filming would be under control and organised.
Once I had my story board’s ready, I was able to start filming and planning where I would be able to start filming.
Appreciating the importance of time management – everything took longer than you thought. Understanding the importance of planning
Whilst filming this sequence, I found time management was extremely important, especially when I had to get it done within a certain amount of time. I found that it took longer than I thought it would take, initially. I knew roughly how long each scene would last and how much filming I would have to do in order to have some extra footage, so that it can be cut in later editing. I made myself a few notes in order to remind myself when and how long I would take for filming, so that i knew i would get it done in a good time scale. By the end of this, I found that planning time management is key for making sure that I had gotten the filming done and ready for the final stages, such as editing and adding in additional things, such as the title sequence text.
The importance of acting skills to carry a convincing project and being professional.
When carrying out this project, I found that professional and convincing acting is really important in order to carry out an effective piece of filming. When organising and working with the actor, I had to make sure that they were okay with what they were doing and knew what they were doing, because I had to make sure that they were following / understanding my intentions for the project in order to make my film at a quality standard. The two actors i had used within my filming were able to carry out the acting with ease, and since it didn’t involve speaking, it was alot easier for them and to just follow the movements that they needed to do and showing the expressions on their faces, in order to carry out a convincing piece of filmed footage.
The value of patience. Working with reliable people.
Throughout filming, i found that a lot of patience was needed in order to make the filming go as fluently and calmly as possible in order for the film to be at a good standard as well as the actors being happy at the end of it. I also realised, throughout the filming, a lot of patience was required, such as when doing more than one take on filming, in order to make it as accurate as possible and for me to be happy with the end result of it. For example, when shooting the ‘dancing’ and ‘car headlights’ scene, it took a lot of takes in order to make sure i had enough footage to select from when editing and which one looked more effective throughout it. I had to be very patient when recording this particular scene because i found from time to time there were some difficulties or some interruptions within the scene, but there were many times when successful filming was shot.
Using sensitivity when selecting locations to get the best out of your actors. Being aware of weather conditions and the personal comfort/discomfort of your actors/crew.
In this project, I knew that there was a lot to consider, but until i started to experience it for myself, I didn’t realise how much there was to consider and how easy it is to forget about the little things which make a big difference!
For example, whilst filming, I had to consider things such as the weather conditions and how it would affect the filming and if it was the appropriate weather for the type of filming I had to do. Luckily for me, the weather was just how I needed it to be, because, since a lot of the filming in the ‘Durham County’ opening sequence is based on dark/mysterious setting, I needed the weather to be dull and cloudy. Luckily for me, the weather was just how I wanted it to be, and another advantage was that it wasn’t raining, which meant that I was less likely to damage the filming equipment.
I also had to consider the actors and additional film crews own personal comfort when filming, such as the weather conditions, temperature, personal discomforts and surroundings. Luckily for me, I didn’t witness a lot of issues with this, but I still had to consider these factors and think about this when filming outside, indoors or the surroundings. I also had to make sure that no danger or harm would occur when filming / to the actors and filming crew.
Main description of project: For my project, I had to recreate a film opening in order to give myself a better idea on what kinds of things are/need to be considered when creating a film sequence.
I found that it’s the little things that make the big difference, such as the organisation and the directing needed within the making of the film.
I found that it’s the little things that make the big difference, such as the organisation and the directing needed within the making of the film.
The film opening I decided to recreate was an opening from a Canadian thriller series known as ‘Durham County’. The film opening consisted of a mixture of settings, actors and props, so it gave me a balance of understanding each of the different factors which needs to be considered in filming.
I did have to consider that I was only able to film, mainly, inside the school, due to the fact that we were unable to take them outside the school at this point. But I was able to record the scenes which involved open space / trees for some of the scenes in this particular opening.
The first scene only required the filming of some dark and shadowed trees. By looking at the actual version of the film opening, I was able to have a clearer view on the kinds of things that needed to be considered, such as the angle, shot, zoom, surroundings and timing of the clip used. With this, I was able to compose this scene by analysing the still frame image I took, and finding a similar surrounding to shoot. I did this by finding a similar spot that involved a lot of shadowed trees (in order to create a similar effect/mood to the original) and by using the cameras ‘zoom’ function by zooming in very slowly, I was able to create the same feel / edge to the original scene, as coming across very sinister and slow. I took this shot from an eye-level view and from a ‘long shot’ to ‘medium close up’ shot, in the same way as the original shows gives of a chilling feel to the opening of this sequence. When I came to editing this clip, I used a ‘fade in’ function to introduce the film clip in the same way the original was, which went from pitch black to slowly revealing the clip. I then included the first piece of text into the film, which is shown in the sequence, to make it look more like the original.


The second scene involved a little more preparation, such as the setting, the props and the actor to help with it. This was done by filming from a bank, overlooking a landscape with a tree/shrub to the side of the frame. The shot was taken from a medium long shot (showing a majority of the actor (not entirely), as well as the landscape behind them) and from a slight ‘low angle’ shot, in order to make the actor look inferior to the person viewing it. The actor is wearing similar clothing to the original (a red jumper) as well as the dark wig and the ‘anime’ mask, to make it look really convincing and chilling, as if it were the original. When doing this scene, my main aim was to make it as similar as I possibly could, and I found I went through great lengths in order to make this scene as similar as possible. When trying to organise the actor, I found that it wasn’t as easy as I thought until I came to having to make the actor act in the same way to how the original actor did in the film sequence. Even though it was a simple swaying movement, from side to side, I found that in order to achieve that same feel/atmosphere that was created for when I first saw the clip, made me realise what I had to do in order to achieve it and how I could do that.

The third scene I made was based on the industrial/river landscape. This scene didn’t require any acting or props; however, I did have to search for a setting which was similar to the original. I had to consider the weather conditions for this, because if I wanted my filming material to be as close as the original, I had to have quite dull and gloomy weather. The shot was taking from an ‘eye level’ shot and I had made sure that the framing was similar to the original, such as filming the setting at a third landscape and two thirds sky in order to create the same feel and edge to the scene. When editing, we tampered with the ‘brightness and contrast’ in order to give it that edge, as well as using a black and white filter on the material itself.

The next scene is based on the characters identity being subtly shown. This is when the opening sequence required the first part of acting / character. For this, I had to find my first actor. To make this scene as convincing and as similar to the original, I had to find an actor that I thought could pull of this particular characteristics and who could do convincing and satisfactory acting without. For this shot, I used a ‘tilt’ movement to a standstill to give the film a little movement, as well as adding am element to the revealing of the character. I found, that when trying to find the similar setting/surrounding to the original sequence, that it was very difficult to creating this particular scenery/set. I knew this was created, by creating a silhouette effect with the light shining through a window; whilst filming the back of the character, but due to the time we had to do the filming, we just settled for finding a window with a divider to create the same sense as the original has created. When editing, I simply adjusted the ‘brightness and contrast’ levels and added a black and white filter to the film so that it was the same as the original. This scene has also been cut and separated in order to place a different film sequence in. This is known as a 'cutaway'. Within this scene, the actor turns his head swiftly to the side, and with this, I had to make sure that the actor did the same and at the same pace. I realised that it’s amazing how important timings and pace is for filming. Nevertheless, the actor I used for this did this with ease and I was able to cut this scene perfectly in time to the original.


For the ‘Basket’ scene, I decided that rather than ‘filming’ the basket, it would be easier to do a still frame image of a basket. This is because i knew that it would be easier to edit and add effects, rather than worrying about the factor of having it blur to not being blurred. I found that the image that was taken, wasn’t as convincing as the original, due to the fact that it was taken as a ‘portrait’ and not landscape, and that the composition and surroundings weren’t the same. If I were to do this differently, I would make sure that I made it more accurate; in terms of adjusting the props/setting differently and making sure that the image/film is taken as ‘landscape’ and not ‘portrait’. When editing this, I simply adjusted the ‘contrast and brightness’ levels and uses a tool to make it blur out, so that it had the same effect. The only disadvantage i had when editing this image as that i was unable to have a two toned colour set, because in the original, there is a black and white/blue tint, but the blood front he basket is still a vibrant red. I struggled with figuring out how to do this for myself and did not have enough time to properly edit the colours to match the original.

For the hair scene, I simply collected a blonde lock of hair (similar to the one in the original) and found an old board to place the nail into, so that I was able to place the hair onto the nail, just like the original. The only disadvantage i found when trying to prepare and organise this scene was that it was hard to find an old, worn board for the background of the set. Once again, due to the time limit we had, I was unable to spend time looking for a board, and had to settle with some plain wooden boards. When filming this scene I made sure that I filmed from an eye level view and making sure I made enough space to film the hand, which places the hair onto the nail.
When editing, I adjusted the ‘contrast and brightness’ and added a black and white filter to give it the same feel and edge as the original did for me, when I first viewed it.

The scene which shows the actor resting upon a table and sitting up rapidly consists of two separate filmed sections. When realising this, I knew I had to film one part based on him resting on the table and sitting up, to being a close up shot and him mid way to sitting up and showing the expression on his face. I found that a lot of explanation, precision and organisation were needed in order to make this scene at a satisfactory and professional level. I found that I had to use a lot of communication for the actor to explain what they had to do and how they had to make it create a lot of feeling and emotion to the film sequence. I used a ‘Medium Long’ shot and a ‘Close up’ shot for this particular scene in order to make it as close to the original. I did find that looking for the setting and set design was very difficult because my main aim was to find a long, landscape window, and due to the amount of time we had to make this, I knew that it was the best I could do for the time being. When editing, I didn’t have to do a lot apart from changing the ‘contrast and brightness’ and adding a black and white filter.


For the figurine scene, I used two toy figurines and positioned them in the exact same way as the original scene in order to make it as similar as possible. I also focused mainly on the ‘pan’ of the film, showing one figuring to another. When filming this I had to consider highlighting the figurines with a light shining above to put the focus on the two props. I also had to consider the pace in which I was filming the ‘panning’ and the time length of the scene itself. When editing, I faced the same problem as I had with the basket, by having two different colour edits in one frame. By the end of it, I just made the film have a black and white filter because it would be the closest to the original as I possibly could.

The housing scene required me have to go out of the schooling area, and use my own camera, in order to get a better shot of a housing setting which is required for this particular scene. For this, I just took a still image of housing and set it to black and white and tampered with the ‘brightness and contrast levels’. Even though I couldn’t find housing in the same position or placement as the original, it was the best I could do at the time, due to the time and the possibilities I was limited to.

For the river scene with the roses, I found that a lot of thought and planning was put into this particular scene, such as finding the flowers to set in the water and somewhere which has a river or a stream. There were a few difficulties when filming this particular scene, such as trying to get the right angle (a slightly raised/high angle) and due to the current being very fast, and not calm like the original filming, it was very difficult to capture and film the roses. For this scene, I simply adjusted the ‘contrast and brightness’ to make the colour of the roses stand out.

The dancing scene, in my opinion, was the most interesting scene I had filmed because I was able to produce a very similar take to the original of the car headlights and the dancing. I created this film by getting some set lights and having them shine towards the camera and placing the actors, dancing, in front of it to create a silhouette effect. I took this film at a ‘medium-long’ shot and ensuring that the actors were in the frame the entire time within this scene. When editing this scene, I intensified the brightness/contrast to make the lights stand out and intensify the silhouette, to make sure that the identity was still hidden but still able to see the figures of the actors. A lot of organisation and communication was needed throughout the filming of this scene to ensure that the actors were keeping at a good style and pace of the dance.

For the scene that involves the boy running, I used a male actor to follow up the same pace of run and actions in order to make this as similar as possible. The only issue with this is that I could not find a similar setting or location to the one in the original scene and somewhere which had enough exposure, but once again, due to the time we had to film the best we could do was near some trees in the night time and shining a torch upon the actor. Once we had cut this scene and it was at the right timing, I was then able to edit it and cut it into the appropriate timings to keep in time with the original version. This particular scene also involved the technique known as a 'Jump Cut' which involves the same film but it has had a section cut out of it so it jumps rapidly, skipping out a piece.


For the scene which involves the actor waking up/startled, I had to film the scene from a extreme close up shot at a ‘low angle’ to make the scene a lot more personal and intense, showing the actor; which emphasises the facial expression and showing his emotion. This particular clip is very short and only lasts a second, but it sets a tone of obscurity and shock to the person viewing the sequence. When editing, I just adjusted the ‘brightness and contrast’ of the scene and set the film to ‘black and white’.

The last scene involved a lot of planning and consideration, due to the setting and the actor for this particular scene. I filmed in a field and set the camera onto a tripod and made sure I made sure I created a similar framing to the original; one quarter landscape/grass and three quarters being sky. When filming this, I had to communicate with the actor frequently about the pace they are walking, the body language they are bringing across, their facial expression and their stride. I also had to tell them were to walking and at what point they needed to exit the frame of the film so that I captured the corner of the shirt, like the original, as the exited the scene. When editing this particular scene, a lot of work has to be put into it, such as the technique of the 'Jump Cut' where scenes had been cut and placed next to eachother to create a skipping motion, the ‘brightness and contrast’ levels, the black and white filter and the white fading out by the end of it. I also had to create the title of ‘Durham County’ from scratch by using the text and using a shape to create a triangle for the ‘A’.


Editing - What I have learnt from the Editing process?:
Throughout this project, I have learnt alot about what is involved when making a film sequence, from the smallest factor of creating rough, drawn up plans down to the matter of filming and editing.
Setting up a project
The software I used for the making of the film sequence, is known as 'Adobe Premiere Pro CS3', a real-time, timeline based proprietary video editing software application, which enabled me to successfully create my opening sequence for 'Durham County'.
 First of all, I had to enter the right information, to initially set up my film sequence. I had to click on the 'New Project' icon in order to get up the further information and instruction to what I would have to do next.
 Once the new project information had been shown, I was able to select one out of the available 'Presets'. I had selected 'Widescreen 48kHz' due to the fact we were using a particular filming equipment/camera which was a '1080i' (the shorthand name for a high-definition television and the i stands for interlaced). This type of camera type required a 'widescreen aspect ratio of 16:9 / a frame size of 1920×1080 pixels. These cameras also he field rate of 1080i is typically 50 Hz or 60 Hz (depending on where the television/viewing is taken place, such as different countries.)
I then had to set a specific 'location' within the computer/a file so that all the information and editing can be saved within that specific location. I then had to 'Name' the file before continuing, so I knew i was able to identify and knew that it if i were to go back and edit it again, i could always remember the name and search for it if i needed to.


The software I used for the making of the film sequence, is known as 'Adobe Premiere Pro CS3', a real-time, timeline based proprietary video editing software application, which enabled me to successfully create my opening sequence for 'Durham County'.


I then had to set a specific 'location' within the computer/a file so that all the information and editing can be saved within that specific location. I then had to 'Name' the file before continuing, so I knew i was able to identify and knew that it if i were to go back and edit it again, i could always remember the name and search for it if i needed to.

There is also a way of making 'custom settings' rather than using the 'Load preset' which is when i had done, but if you were to make your own 'Custom Settings' then it just comes to more specific information needed to be filled in, such as the 'Editing Mode', 'Timebase', 'Frame Size' (horizontal and vertical), 'Pixel Aspect Ratio', 'Fields', 'Display Format', 'Title' and 'Action Safe Area', 'Sample Rate' and 'Display Format'

Once I was happy with the way the structure of my file was set out, I was able to start the making and editing of my film sequence.
(The picture below show how the layout of the editing application looks before the constructing began)

Importing and exporting footage
 Process for Importing Footage:
In order to import a piece of footage, or file, into the making of the film sequence, I had to go to the 'file' tab and select the 'Import...' From this, I was able to select the files i needed to import, such as a video or image file.


In order to import a piece of footage, or file, into the making of the film sequence, I had to go to the 'file' tab and select the 'Import...' From this, I was able to select the files i needed to import, such as a video or image file.

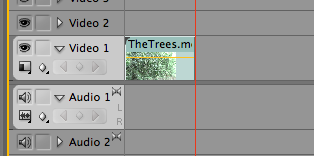
Once the file(s) had been imported, they appeared on the left of the application of Premiere Pro, and indicated me (by a symbol) to say whether they were a sound, video or picture file. From this side box, I was able to slect the file I wanted to use, and drag it over to the timeline formatter so that I was able to edit the file.


Process for Exporting Footage:
Exporting the footage is a pretty simple task. To do this, all I had to do was; once I had completed my film sequence and when I was ready for exporting, I went into 'File', clicked 'Export' and then 'Movie...'


Cutting footage
Once I had successfully imported my file into the time line, I was able to continue further with my film sequence and edit it. First of all, I had to cut the film file, I had imported, down to size. I did this by using/selecting the 'Cut' tool (shown, highlighted, in the image below). By making a guideline (with the red line) to where I wanted the strip of film to be cut, I was able to make it easier for myself to where I wanted to have the film cut, specifically.


Once I cut the individual strip into one or more, I was able to select the film section which I wanted to 'delete' or 'Clear'. I did this either by selecting the film I wanted to delete, and pressing ether the 'Backspace' or 'Delete' button on the keyboard, or by right clicking the film strip and selecting 'Clear'.
Unlinking sound
Initially, Once I have imported my file (film file), it came with a sound file which was the background noise which was recorded whilst i was filming. Because I didn't want the natural bacground noise and wanted a piece of music in the background, I had to get rid of the original sound file.

To do this, I had to right click the file that I wanted to be unlinked (the sound file) , and selected the 'Unlink' option. Once I had done this, the files have been unlinked, which meant I was able to select and delete the sound file.


Scaling and resizing clips (window; effects controls; motion control) and in points and out points
To enable myself to 'Scale' and 'Resize' the clips I had, I had go to the window tab, select effects controls and then select motion control.
This enabled me to be able to adjust/change things such as the 'Position', 'Scale', 'Rotation', 'Anchor Point' and Anti-Fickle for the Video.


There was also an ability to be specific with the types of effect/transitions to be precise and to my preferences. (In and Out points to be specific for the duration of the 'in and out' / opacity that can be applied to a film)

Adjusting framing and realising the importance of good camera work

When editing my film, I did find that at times I would have to adjust the frame of the film itself or position it so that it is in central viewing, rather than to the side, up or beneath the main frame.
To do this I just clicked onto the screen of the film and it came up with points where I could enlarge/resize it.
The importance of lip syncing.
Even though I didn't use the use of lip syncing within my film sequence, I was fully aware of how important lip syncing can be when it needs to be included within a film sequence.
If the use of lip syncing had to be used within a film, I know that the actor would have to be in time/pace with the sound they are mimicking. To make this alot easier for the actor, I would play the sound/speaking part to the actor who is lip syncing and play it whilst they lip sync, so that it will be convincing.
I would then unlink the sound from my own filming and replace the sound with the real piece, which was being lip sunk.
Understanding the value of Pace.
When filming, I had realised that the pace within a film sequence or any type of filming is highly important.
When I was cutting and putting the filming into place, I found (especially when we were making a remake) that the pace was extremely important.
With our particular film sequence, we found that we had to cut our filmings in the precise time with the music/beat and making sure that they were at a good/exact pace to the original (since this task is based on creating a remake of a film sequence)
Flipping film where necessary.
To flip the film where necessary, I went into the 'Effects' options and selected a folder called 'Transform'. This particular folder enabled me to have to choice to 'Crop', 'Edge Feather', 'Horizontal Flip' or 'Verticle Flip'. For this particular effect, I needed to use the 'Horizontal Flip' in order to have my film still up right, but as if it is the reverse image (Mirrored) from the side.
To flip the film where necessary, I went into the 'Effects' options and selected a folder called 'Transform'. This particular folder enabled me to have to choice to 'Crop', 'Edge Feather', 'Horizontal Flip' or 'Verticle Flip'. For this particular effect, I needed to use the 'Horizontal Flip' in order to have my film still up right, but as if it is the reverse image (Mirrored) from the side.


Speeding up or slowing down (right click speed/duration)

For my film sequence, some of the film footage required some changes in the speed of the film itself, either slowing down or slowing up.
In order to change to speed of the film clip, I simply right clicked the film I wanted to change the speed/duration of and clicked the option saying 'Speed/Duration'.This enabled me to adjust the speed of the film as a percentage.
Having a higher percentage meant that the film would be at a faster pace
and having a lower percentage meant that the film would be at a slower pace.Titles and font styles used how difficult was this to match the original font.

For this particular task/project, I had to make sure that I made everything as similar as I possibly could to the original film sequence I was remaking.
Because of the amount of options, font styles, colours...etc that were available, I found that it was very difficult to make sure that I had the same / similar title to the original.
However, I was able to make the font similar enough to be convincing to the viewer to be the same/similar.
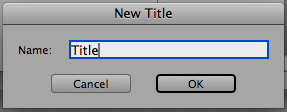
In order to insert a title into my film, I had to select an icon known as 'New Item' and would then select an option known as 'Title'. A box appeared where I had the option to name the file of the title I was going to create. Once I had named the title, I was then able to start creating and editing my font to how I wanted it.

For this particular task/project, I had to make sure that I made everything as similar as I possibly could to the original film sequence I was remaking.
Because of the amount of options, font styles, colours...etc that were available, I found that it was very difficult to make sure that I had the same / similar title to the original.
However, I was able to make the font similar enough to be convincing to the viewer to be the same/similar.

Additional Images of Film Techniques I came across:
Throughout the editing process, I had come across various different effects and transitions that could be used for my film sequences.
On Premiere Pro there were many files which contained various different types of effects and transitions which I could apply to any of my filming.
Throughout the editing process, I had come across various different effects and transitions that could be used for my film sequences.
On Premiere Pro there were many files which contained various different types of effects and transitions which I could apply to any of my filming.

